Using zoom in on Premiere Pro, well… On any video editing software makes a bold statement. It brings serious attention to the subject and must be used wisely – and scarcely. You always see them in commercials and music videos. But these must be used to focus on something of importance. That’s why in today’s article, we look at how to zoom in on premiere pro. It’s not as hard as you think but looks pretty cool. Perfect for YouTuber’s or production houses working on commercial work.

It’s fun, it’s easy to use, and most importantly, it looks incredible.
Let’s check it out.
How to Zoom in on Premiere Pro Without Losing Quality
Here we break down the steps so you can implement that iconic zoom in feature in Premiere Pro.
Let’s jump into it.
1. Import your video
Firstly import your video into Premiere Pro and drag your clip over onto the Timeline; you’ll then be able to add the keyframes to implement the zoom in effect.
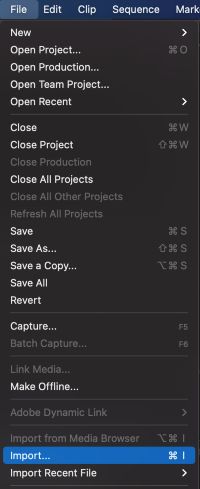
2. Adding keyframes
Now, with the clip selected, we will add the first keyframe. We will add these keyframes to allow us to scale and position.
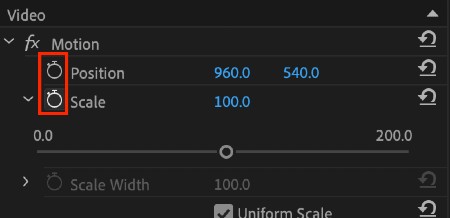
In the effects window, locate the “Stopwatch” icon that sits next to the Scale and Position options – now click on it.
You’ve now added your first keyframe.
You may also be interested in reading What is a keyframe?
3. Completing the full zoom in effect
Once you’ve enabled the stopwatch, Premiere Pro will add a new keyframe every time the parameter is adjusted.
To complete this, find the last frame in the clip and adjust the Scale and Position parameters.
When you adjust the parameter, Premiere Pro will pop up a new keyframe at the end of the clip, where selected. It then interprets it into a zoom motion between the two keyframes.

To make the motion a lot smoother, you can use the Ease In or Ease Out effect.
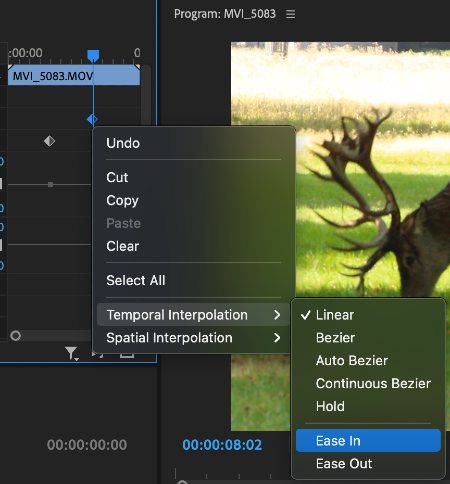
To get this effect up and running, simply right-click at the end of your last keyframe and simply select either “Ease In” or “Ease Out”.
It’s as simple as that!
Bonus: Save the zoom as a preset
Now it’s time to save the zoom in effect as a preset.
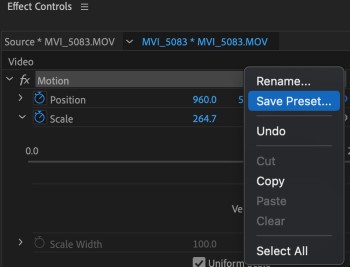
To save your preset, simply go to the “Effect Controls” window, and with the full motion selected, right-click on the menu.
Select “Save Preset” and ensure you’ve checked the “Scale” box as they type of preset.
Now name your Preset, something you’ll remember, so when you next need it, it’s easy to find! Now once the above is completed, simply click on the Panel Menu, and click Save Preset.
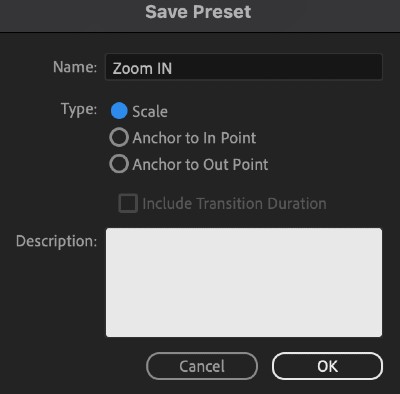
So, whenever you need this zoom in effect on Premiere Pro, just jump into your Presets Folder and locate the name; it’s as simple as that!
Our favourite zoom transition in Premiere Pro
Here’s our favourite zoom transition in Premiere Pro; we will also link down below our top free transitions and our favourite paid transitions to help you select whats suits your film best.
Here’s our favourite zoom transition in Premiere Pro.
Dolly Zoom Effect
Here’s how to do our favourite Dolly Zoom effect in Premiere Pro. A dolly zoom effect is usually created by dollying your camera backwards and forwards whilst zooming into your subject.
To create this effect in-camera can be pretty time consuming, and you’ll need a lot of people and equipment to achieve something insane, however. You can create a pretty good Dolly Zoom effect in Premiere Pro, and here’s how you achieve it:
Choose your clip
Firstly, choose your clip and import it into Premiere Pro.
To master this, find a clip that moves both back and forwards. Or, film one yourself – just ensure there is no zoom.
This effect also works best when your clip has a clear subject, though this is not necessary.
Create the zoom
Now your clips are ready to go, it’s time to create Premiere Pro’s zoom in effect.
This part is easy because you already know how to create a basic digital zoom—and that’s all it is!
Now set your keyframes (as shown above) to the start and the end of the dolly movement, and test until you’ve perfected it. Remember to make sure that your subject stays the same size during the full length of the video.
And there you go, that’s the dolly zoom effect in Premiere Pro. Pretty cool. We also have a whole resource dedicated to free transitions in Premiere Pro, that’s got the best free transitions you can imagine.
We’ve also have got a paid version too – You can view The Top 11 Transitions in Premiere Pro here. But if you are a filmmaker on a budget, we recommend you scour the free versions first.
Here’s the full resource for the best free transitions in Premiere Pro.
We hope this article on “How to zoom in on premiere pro” was useful to you. Let us know your thoughts down below in the comments. For more Premiere Pro articles and resources, scroll a little further!