Slow motion videos can look incredible if done the right way. We delve into how to create a slow motion in Premiere Pro – and shoot it smoothly.

To get the slow motion looking smooth, you’ll need to shoot video at a high frame rate, then reduce it within Premiere Pro.
Most DSLRs can shoot 720p or even 1080p at 60 frames-per-second (fps). By filming at 60fps it will allow you to playback your footage at a lower fps (24fps) whilst maintaining that sleek, cinematic look.
In today’s article, we look at the reasons why you should create slow motion footage and how to create slow motion video in Premiere Pro.
Let’s dive right into it.
You may be interested in DSLR camera guide: What to look for when buying a DSLR?
Why should you create a slow motion video in Premiere Pro?
There are many reasons to create a slow motion videos in Premiere Pro, we can think of two straight off the bat – it’s fun, and they are perfect for commercials.
Here are a few reasons why you should create slow motion video:
- It’s cool. If done right, it looks incredible.
- It can create an artistic look.
- Perfect for music videos and commercials.
- You can build suspense using the slow motion effect.
- Ideal for sport videos, both highlights and commercial.
- You can use it to replay a special moment.
These are just a few special reasons why you should use slow motion as an effect. It’s a pretty cool effect, but you’re now wondering how can I create it smoothly?
No worries, we have you covered below, let’s get into it.
How to create a slow motion video in Premiere Pro
Here’s how to create quality slow motion video in Premiere Pro with these simple and easy to follow steps.
Import your footage.
Firstly, import your footage into Premiere Pro, simply open up Premiere Pro, and drag your preferred files into the Project Panel in Premiere Pro.
Slow down the footage in your timeline – Create a sequence
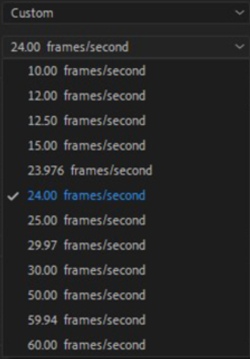
Creating a sequence and adjusting the FPS to 24 is the first step. Simply, create a sequence and select the FPS as 24.

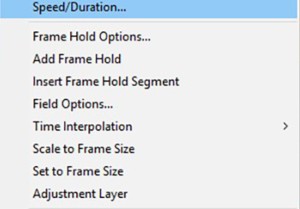
Now drag your 60fps footage onto your reduced 24fps timeline. Right-click and select the “Speed/Duration” option.

Set your speed
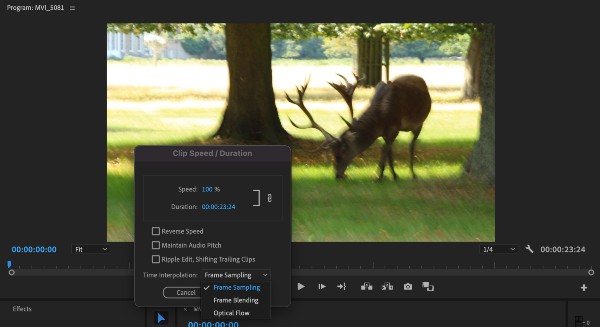
Now you have reached the speed section, set your speed to between 40%-45%. Any lower than 40% will have an adverse effect on your video and will leave it laggy and a bit choppy.
Your footage will now playback nice and smoothly with no issues whatsoever, leaving you with a cool slow-motion effect.
There you have it, that’s how to create slow-motion effects in Premiere Pro. There is another way to do this, if you scroll below, we show you how to create the slow-motion effect using the Optical Flow effect.
You may also be interested in Playback Speed in Premiere Pro
Slow motion using the Optical Flow effect in Premiere Pro
Using the Optical Flow effect in Premiere Pro will allow you to create smooth looking slow motion video. Here’s how to achieve that!
Firstly, import your video and make sure it’s been added to the timeline. Now right-click on the clip and select the Speed/Duration box.

Se the speed to 50% and then make sure to select the “Time Interpolation > Optical Flow option.
For improved performance, go to the menu and click on Effects Controls > Time Remapping and Add Keyframes.
Now set your speed for the slow motion effect, and play around with the settings until you get the smoothest, slowest clip you can.
Now once you’re finished, make sure to go back to Time Interpolation > Optical Flow to ensure a smooth slow motion effect.
There you have it, that is how to create slow motion video effects in Premiere Pro using the Optical Flow effect.
We hope this article on “How to create slow motion in Premiere Pro” was useful to you. Let us know your thoughts down below in the comments, we love to hear from you all.
Scroll a little further for more Premiere Pro articles and resources.
Happy editing!