Cropping a video in Adobe Premiere Pro isn’t as straightforward as it is in Photoshop, but that doesn’t mean you can’t do it. A question we are commonly asked is “How to crop video in Premiere Pro”. It’s one question we want to answer in detail so you can perfect the art of cropping videos in Adobe Premiere Pro.

Once you master the skill of how to crop videos in Premiere Pro, you’ll never look back. It’s pretty simple to learn, and you’ll crop video at the highest level once you follow the six simple steps below.
In today’s article, we will break down the question “how to crop video Premiere Pro” into bitesize pieces.
Here’s our step by step guide on how to crop video in Premiere Pro.
How to crop video in Premiere Pro
This is how to crop video in Adobe Premiere Pro in six simple steps. These simple steps will help you transform your video footage in no time with precision and perfection.
Let’s check them out.
Import your video files
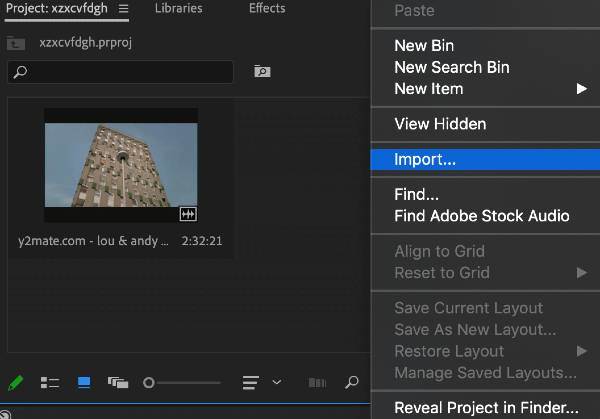
Firstly, ensure you have imported all of your video files in which you want to edit. To import these, either drag and drop them onto the timeline from the source. Or, you can locate them by simply clicking Control > Import or CTRL > Import in Window.

Locate the video effects
Now locate the video effects panel, usually found next to your project tabs. If you can’t find it there, simply access the project panel and click to add the effects panel on your screen.
Access the crop effect
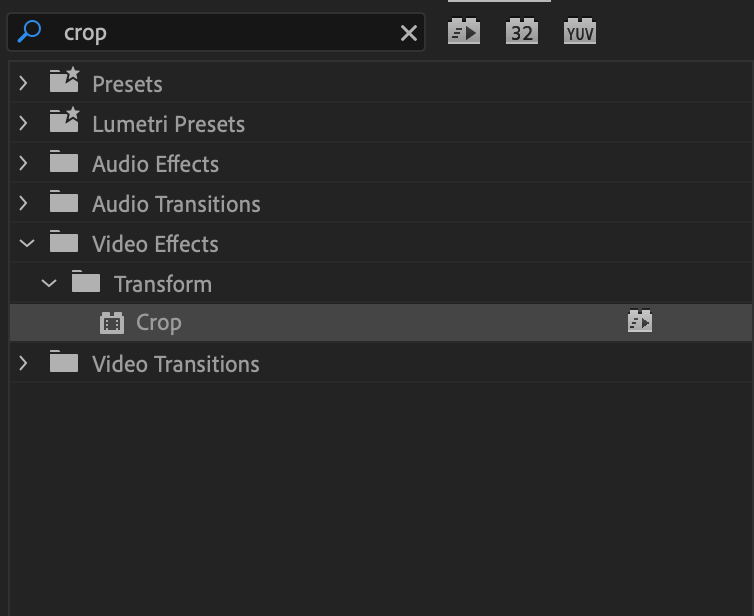
Once you’ve located the effects tab, simply click video effects and search for the crop effect. It will pop up as follows:

You can also locate the crop tool by simply clicking the effects folder, find the Transform folder, and then selecting the crop effect. Then drag the crop effect onto the video you wish to crop.
Now you’ve found the crop effect, simply drag the crop effect onto the video you wish to crop.
Remember to crop all sides of the video.
Now you’ve added the crop effect to your video, it’s time to crop the video. Remember to crop all sides of your video unless you are cropping the full movie to add a cinematic feel to the footage. This is where you crop the top and bottom to suit the dimensions of a cinema or theatre.
Read more on turning your video footage into a cinematic masterpiece below using the crop tool in Premiere Pro.
Choose your crop dimensions.
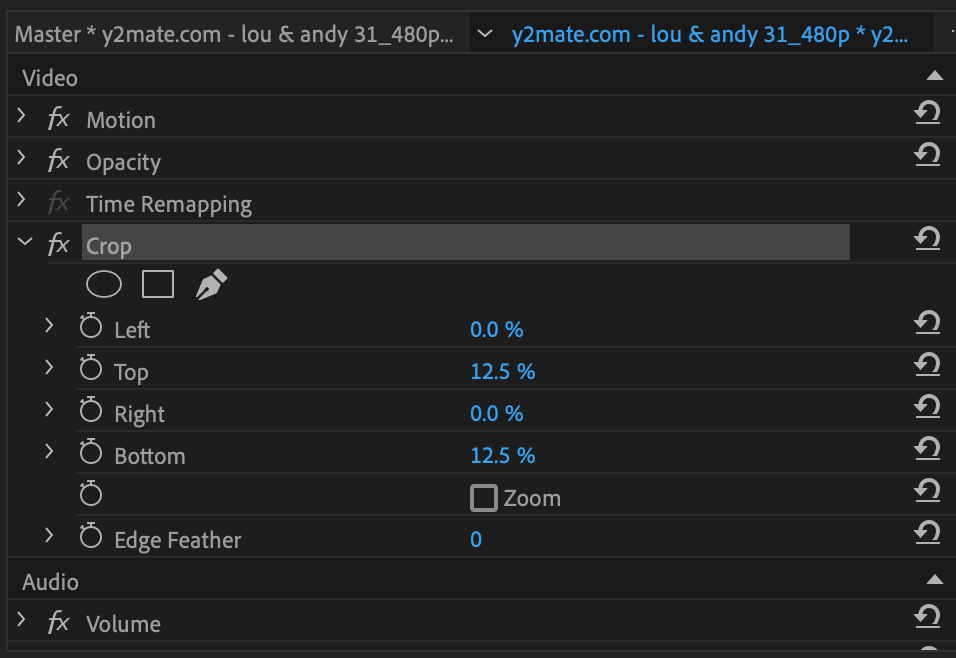
Now you can choose the crop dimensions for the top, bottom, left, and right sides of your video. To edit these, either use the slider function or enter a number into the box to determine the crop’s depth.
Make sure you edit it to fit the purpose of your project. If you are looking to create a cinematic masterpiece, you will be looking at a shallow crop, both top and bottom.
Whereas if you are looking to crop video for a VFX in your film to play over a blank screen, you’ll look to crop all of the sides to suit where you will overlay the footage.

You have now cropped your video to perfection!
Finally, add effects (If you want to).
Now your video has been cropped if you are interested in having any more effects to your video. Simply go back to your Project Panel and click search and look through all of the effects and transitions that will suit your project.
Read More: How to sync audio in Premiere Pro
We hope this article on how to crop videos in Adobe Premiere Pro was helpful! Let us know down in the comments what you thought, and scroll below for more amazing resources on Adobe Premiere Pro.