You’re already cracking on with your edit and have assembled a couple of shots within the timeline in Premiere Pro. You now want to assemble the best sequence settings in Premiere Pro. You now need to create a new sequence for your edit, it’s now time to create that sequence in Premiere Pro and ensure you have those sequence settings in Premiere Pro nailed.
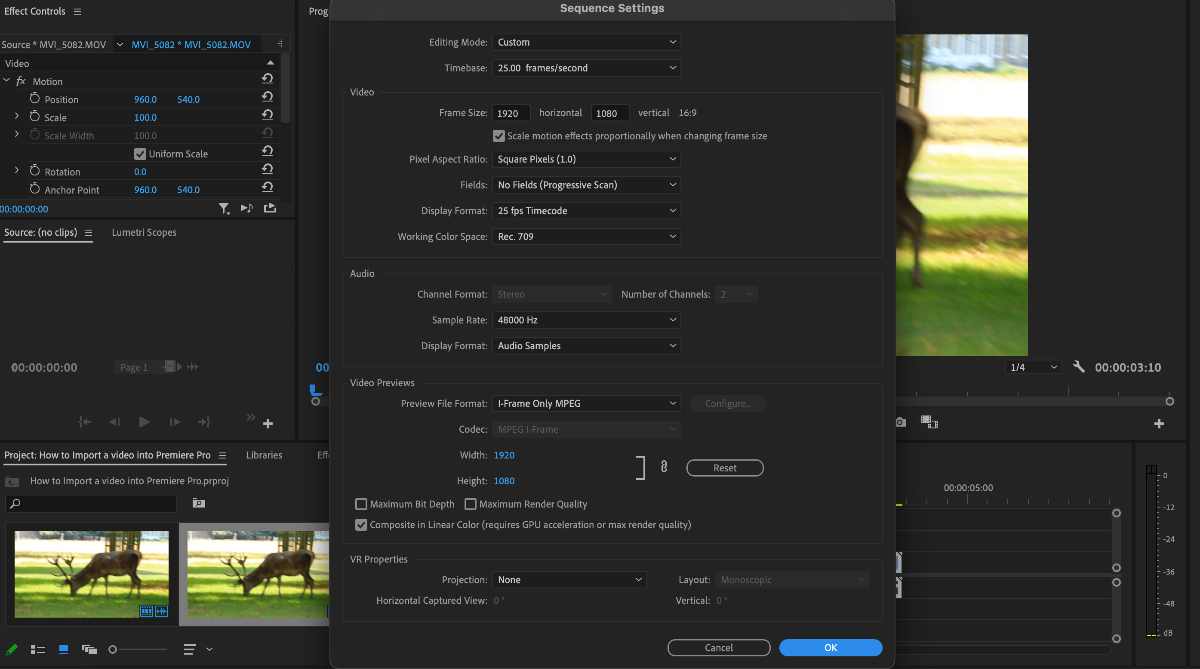
We can help you with that. Here’s our comprehensive guide on all things sequence settings. What the best options are for 4K videos or the best settings for a YouTube video.
| Timebase | Frame Size | Aspect Ratio |
| 23.976 | 1080×1920 | 16:9 |
| Timebase | Frame Size | Aspect Ratio |
| 23.976 | 1080×1080 | 1:1 |
| Timebase | Frame Size | Aspect Ratio |
| 23.976 | 1920×1080 | 9:16 |
| Timebase | Frame Size | Aspect Ratio |
| 23.976 | 2160×3840 | 16:9 |
Let’s get into it!
What is a Sequence in Premiere Pro?

A sequence in Premiere Pro is essentially what sits on your timeline. It’s a combination of all the video and audio clips you have knitted together for your project.
The timeline panel in Premiere pro is where you can visualise your video and audio sequences. Getting the right settings will determine the way you export and watch your video. It determines the size, resolution and overall quality of your final product.
Within your timeline, you can adjust different settings and transitions within the sequence and allow you to customise everything per sequence. It makes the process much quicker and more efficient and enables you to edit as a whole.
This allows you to adjust the settings for everything linked within the sequence, including resolution, FPS (Frames Per Second), size, resolutions and much, much more.
Overall it’s an efficient way to edit, and you can also match the settings of each sequence to save you even more time – more on this later!
You may also be interested in reading about How to Import MKV Files in Adobe Premiere Pro [SOLUTION]
How to Create a New Sequence in Premiere Pro
To create a new sequence in Premiere Pro, there are a couple of methods to create a new sequence:
- The first method is to simply drag and drop your video file into the Premiere Pro timeline, automatically creating a sequence.
- Secondly, Right-Click in the Project Panel and then select New Item > Sequence.
- Or you can drag your footage into the small box in your Project Panel.
- Finally, you can use the shortcut Command-N or click on the top menu, File > New > Sequence.

All four of these options are how you create a new sequence in Adobe Premiere Pro.
The Best Sequence Settings in Premiere Pro
What are the best sequence settings in Premiere Pro? Let’s have a look! The sequence setting window will pop up after you create your new sentence and look like the one below:
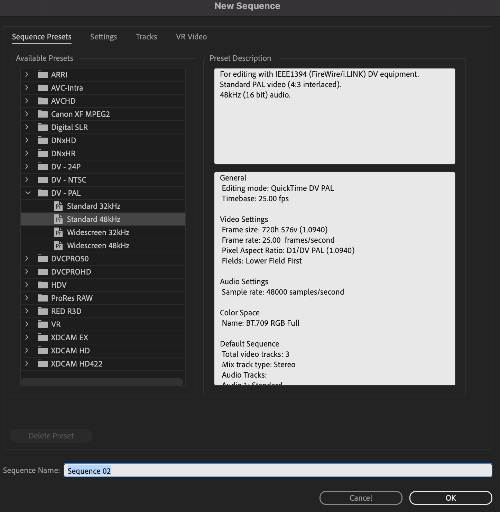
Most of the time, it’s best to allow Premiere Pro to match your preferred settings as they nail it most of the time. But, there are times when you will want to set your sequence settings.
If you have a specific issue or setting in mind, stick with us! If not, scroll down to the section on “How to create a custom preset in Premiere Pro for your sequence” or “How to match sequence settings from the already existing video in Premiere Pro”.
If not stick with us, and we will show you the best options for different scenarios!
The Best Sequence Settings for UHD in Premiere Pro
If you’re looking for the best sequence settings for UHD in Premiere Pro, here are the steps you should follow:
- Press Command N or Control N (Mac or Windows) to open the sequence settings menu.
- Next, scroll down to ProRes Raw. Select ProRes RAW 4k 23.976.
- Now you need to click on the settings header.
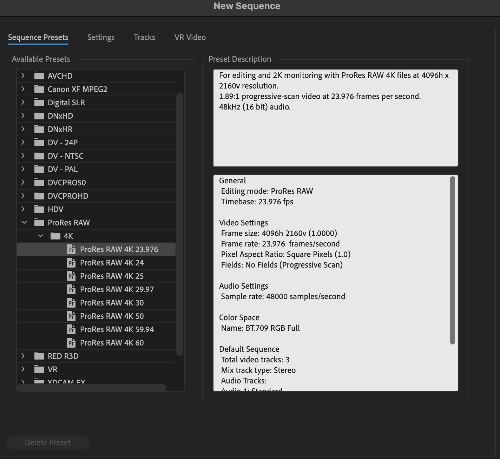
- You will want to change the dimensions to 3840 x 2160.
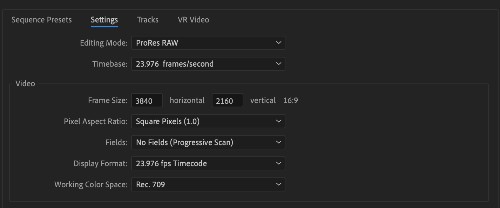
5. Finally, save your settings and save them as a preset if you’re looking to use them often. Presets are a great way to improve the efficiency of your editing.
The Best Sequence Settings for 4K in Premiere Pro
The best sequence settings for 4K video in Premiere Pro is as follows:
- As usual, press Command N or Control N (Mac or Windows) to open the sequence settings menu.
- Scroll down and select ProRes Raw and click on ProRes RAW 4k 23.976.
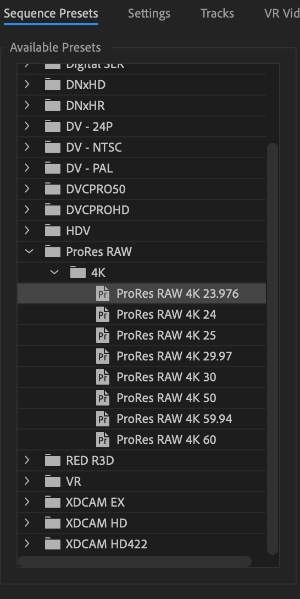
- Now head to the settings tab. Browse the options, but we recommend leaving it as it is. If you want to change it to something specific to experiment, you are more than welcome, but we advise you to leave it as is.
- Finally, rename it to something memorable. If you need to reset any of the settings, simply hit Command N or Control N (Mac or Windows) to revise these settings, and then you can also save it as a preset. You’ll be able to reuse this anytime you need the perfect 4K set-up.
Next up, we drill down into the best sequence settings for 4K in Premiere Pro.
The Best Settings for HD Video in Premiere Pro
The best setting for HD Video are as follows:
- Press Command N or Control N (Mac or Windows) to open the sequence settings menu.
- Now click on ARRI and select ARRI 1080p 23.976.
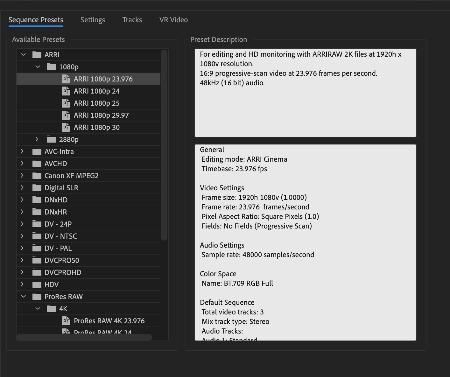
- Head to the settings tab, and it should be set to 1920 x 1080 at 16:9. If it’s not, for whatever reason, make sure you set this setting to ensure you have the right video sizing and output.
- Now you’ve set it; it’s time to save it. And there you have it, the perfect settings for an HD video.
Read More on how to export video from Premiere Pro.
Video on Premiere Sequence Settings
Here’s a great video which breaks down everything about sequence settings. Be sure to watch the entire video as its only 5 minutes long.
How to Create a Custom Preset in Premiere Pro for Your Sequence
Follow our simple steps to create a custom preset for your sequence settings in Premiere Pro.
- Click Command N or Control N (Mac or Windows) to open the sequence settings menu.
- Now, select the preset options you wish to use on the left-hand side. For the best sequence settings, use one of the suggested setups above. Click on settings to add anything else needed.
- Now you have your preferred settings, it’s time to save them as a preset. To save them as a Preset, simply hit “Save Preset”.
- Now name your preset anything memorable to reuse it time after time.
This will allow you to automatically set sequence settings by selecting the preset from the sequence settings under Sequence Presets.
For more in-depth presets in Premiere Pro, read our guide.
How to Match 4k Sequence Settings Premiere Pro From Already Existing Video
This is pretty cool to understand. It’s how to match sequence settings in Premiere Pro from an already existing video.
- Firstly import your footage into Premiere Pro.
- In your project window – drag your footage into the box in the bottom, right-hand corner. This creates a new sequence that will match the settings of the footage that you imported.

- You will see your footage in your Timeline. Your sequence will have adopted the settings of this footage. You can remove it if you only need to match the sequence settings, or you can keep it there and add it to it.
- In the Project Window, you can see your new sequence has been created and named the same name as your clip.
- Now you should organise your new sequence. Drag this out of the footage panel and into a new panel named “New Sequences”.
- Finally, rename your sequence. This way, you’ll be able to reuse this sequence as a preset sequence in the future.
We hope this article on the best sequence settings in Premiere Pro was useful to you. Let us know your thoughts or questions below in the comments; we love to hear from you.